Find out why you should create multiple pin images for each blog post, why you need to hide Pinterest images in your blog posts, and how to hide pin images in your blog posts
Why you should create multiple pin images for each blog post
There are several reasons why you should create multiple pins for each blog post:
1- Get additional pins, repins, and traffic. Having more pins means getting more repins, clicks, and traffic to your blog.
2 – Test which images work best. When you have multiple pins, you can test different images, colors, headlines, descriptions, and keywords and find out which pins give you the most repins and clicks to your blog.
3- New pin images are new content. Pinterest likes new content and they consider a new pin image as new content – even if it goes to an old blog post. Pinterest doesn't like it when you're pinning the same pin repeatedly. Pinning new content is even more important today than ever and will give you more exposure than repinning old pins.
4 – Readers can choose which image(s) they want to pin and even pin several images. When putting multiple pin images in your blog posts, your readers can save multiple images to Pinterest and can get you additional pin views, repins, clicks, and traffic.
3 Reasons to hide images from Pinterest
You want to create multiple Pinterest pins for each blog post but you don't want to show 3+ large Pinterest images on your blog posts. Here's why:
1 – You don't want to clutter up your blog posts and design with too many large Pinterest images and with images that don't fit your brand colors.
2 – You want to hide images that are unrelated to the content of your blog post.
You may have images in your sidebar (e.g. an affiliate product) that are unrelated to the content of your blog post. You also probably don't want people to pin your profile images, logos, popular posts, and related post images.
You want to show only the images you want your visitors to save to Pinterest and hide images you don't want them to pin.
3 – You may have images in your blog posts that are not great for Pinterest.
You may have small images or horizontal images that are not great for Pinterest and you don't want people to pin those. You want people to pin images that will give you the best results from Pinterest.
I also don't want people to pin some affiliate images or other images that are in the content of a post.
How to hide Pinterest images in your blog posts
There are several ways to hide Pinterest images in your posts. You can use one of the methods below to hide extra images.
1 – Hide them manually with code.
To add the code, change the view mode from Visual to Text, and you will see the code for your images.
To hide any image, add this code to the front of the image you want to hide:
<div style=”display: none;”>
and put this code after the image code
</div>
Here's the code:
<div style=”display:none;>YOUR IMAGE CODE HERE</div>

Avoid problems using the code
It's important to use regular quotes (“”) in the code and not use curly quotes. If you copied the code in MS Word, your quotes could be curly quotes depending on your Word settings. If you're using curly quotes, the code won't work and you won't be able won't hide your images.
In fact, the first time I tried using the code myself, I had used code I had found on a website. The code had curly quotes and it didn't work.
Because I know some basic coding, I figured out what the problem was. But I know a lot of people have encountered this problem.
Copy the code and save it in a text file (not in a Word file).
<div style=”display: none;”> and use this at the end </div>
Also pay attention to exactly where to put the code. Make sure to add the ending code before </P> or </div> code.
After putting in the code, check your blog posts to see if it is hiding the images you want to hide.
NOTE: When using this code to hide images, the images still have to load and this may slow your site speed.
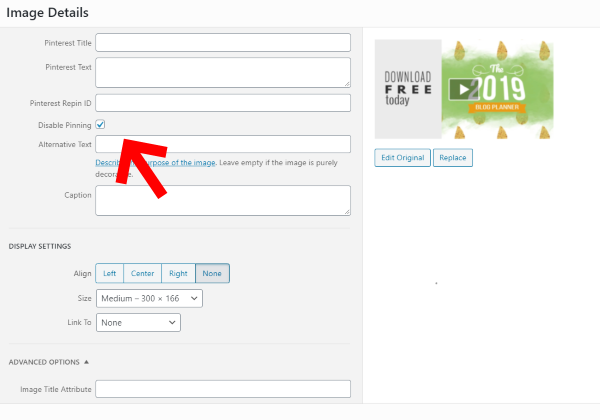
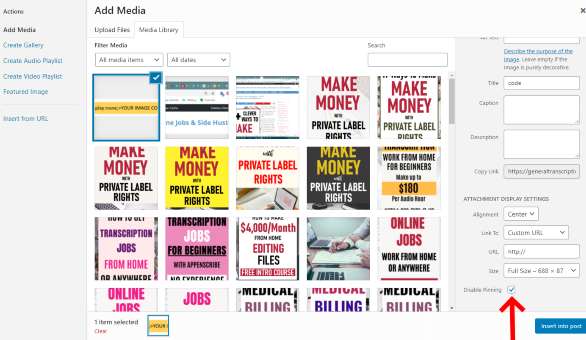
2- Use WP Tasty Pin Plugin – The easy way to hide Pinterest pins in your blog posts
Using the Tasty Pins WordPress plugin makes it very easy to hide your pins in your blog posts. You can use Tasty Pins to add your pins, hide images, add descriptions to your images, improve your Pinterest SEO, and make your pin images pinnable.
At first, I used to hide my pins with the code I'm mentioning above. But when using code, I forgot to add pin descriptions!
Optimizing your pins, adding pin descriptions, and hiding pins is so much easier when using Tasty Pins. Using Tasty Pins has seriously improved my Pinterest SEO.
Advantages of Tasty Pins
- Easily hide Pinterest images from your blog posts.
- You can set a description for each image or put in the description once that will be used in all your Pinterest images on your blog post.
- Add alt text.
- Disable pinning on images you don't want poeple to pin (this is very helpful!). You can control which images show up and hide some images you don't want people to pin (e.g. small images, horizontal images, images unrelated to the post).
- Add a hover button on all images.
Check out Tasty Pins here. I think you'll like it as much as I do.
How visitors find and schedule your hidden images
Readers often use multi-select tools such as the Pinterest browser extension or the Tailwind extension button to see and pin hidden pins.

NOTE: I highly recommend using Tailwind to schedule your Pins. The Tailwind publishing extension makes it super easy to schedule and publish content to Pinterest.
Grab your FREE Tailwind Trial here!
See my Tailwind review here.
Pinterest SEO
It's important to add a title tag and ALT tag to any images you put on your blog, including Pinterest images. Adding a TITLE tag and ALT tag to your images will help you with Google SEO and with Pinterest SEO.
Make sure to include your most important keywords in both the title tag and alt tags.
Using the Tasty Pins plugin has also helped me improve both my Pinterest and Google SEO.
I hope this post explained how to hide Pinterest pins from your blog posts either manually or with a WordPress plugin.
SOCIAL MEDIA RESOURCES
- The Best Free Stock Photos and Images.
- Tasty Pins plugin – WordPress plugin that hides and optimizes Pinterest images in your blog posts.
- Tailwind – The best scheduling tool for Pinterest. They have an Instagram version too (but I haven’t tried Tailwind for Instagram yet). Read my Tailwind review here.
- SmarterQueue – An all-in-one social media management tool that boosts engagement and lets you curate, schedule, listen, reply, and analyze in one place (SmarterQueue comes highly recommended by experts).
- SocialPilot – Automates scheduling for a wide range of social media (I’m using it for Twitter and Facebook scheduling). You can read my review of Social Pilot here.
- Hootsuite – Automates scheduling for several social media (I used to use it but switched to using SocialPilot). You can read my Hootsuite review here.
- Social Media Marketing World 2021 – Discover the best social media marketing techniques from the world’s top experts. Or get the 2020 recordings.
