8 Proven Ways to Skyrocket Pinterest Clicks and Repins
and Get Massive Traffic to Your Blog
This post covers 8 proven ways to be more successful with your Pinterest marketing, get more Pinterest clicks and repins and get more traffic to your blog.
1 – Create high-quality, good-looking, pins
Creating good-looking pins is the first important step to be successful with Pinterest. If you don't get enough poeple to click on your pins or save your pins, change the design. It can make a huge difference.
Visitors will save pins and click on pins that catch their eye and appeal to them. You want to create good-looking, quality pins with appealing titles that stand out from all the other pins.
For more details on how to design attention-getting pins, you can read my blog post, 10 Pinterest Pin Design Tips to Boost Your Blog Traffic.
You may also want to read my blog post about Pinterest Templates: How to Create Beautiful Pinterest Pins Quickly and Easily with Canva Templates
Use quality images
To create good-looking pins, you need to use quality images.
I started out using free stock photo sites for my social media images but other poeple in the same niche were using the same images on Pinterest and other social media sites.
I now use a combination of free images and paid images. For some topics, I use my own photos (which give me the best results).
Here are some of my favorite places to get quality images:
- DepositPhotos
- Pixistock
- Ivorymix
- Canva templates for Pinterest
- Get 550 free stock photos
- Stock photo membership
Get a list of sites where you can find free image from my blog post, Where to get Royalty FREE Stock Images and Photos for Your Blog and Social Media.
Use a great graphics program
Canva and PicMonkey are easy-to-use programs to design Pinterest and other social media images.
Canva is the easiest tool to create compelling Pinterest images for people who don't have a graphics background. For too long, I continued using a simple graphics program I was used to because I didn't want to spend the time learning a new program.
I finally started using Canva and I'm amazed on how much faster and easier it is to create great pins and how much better my pins are since I've been using Canva.
I also use a wide variety of Canva templates that makes it even easier to create beautiful pins. I make a few small changes to the templates to make them unique. To find sites that provide free and paid Canva templates, check out my blog post, How to Create Beautiful Pinterest Pins Quickly and Easily.
I recommend using Canva for creating Pinterest and other social media images if you're not a graphic designer. Canva has a free and paid version. Check it out here.
PicMonkey is another popular and easy-to-use graphics program many people use to create Pinterest and other social media images. It's easy to add text and graphics to images + it includes a wide range of editing tools that are easy to use. Want to see what PicMonkey is all about? Sign up for your free trial today!

Photoshop is one of the most powerful graphics program for graphic designers but is too complex for newbies.
2 – Pin consistently
Pinterest wants you to pin consistently and pin a lot. What is a lot? Following the latest Pinterest guidelines that recommend pinning maximum 25 pins a day, I reduced my pinning from 50-70 pins a day to around 25 pins a day and set my Tailwind schedule accordingly. You need to pin every day and pin consistently. Consistency is more important than quantity. It's okay if you pin less than 25 pins a day but you don't want to pin 20 pins on day and none the next day.
To ensure I pin consistently and don’t skip pinning on hectic days, I use Tailwind.
You can read my Tailwind review here and check out Tailwind's free trial here.
3 – Create multiple pins for the same blog post
I recommend creating a minimum of 4-6 pins per post. You can make easy variations by changing the image, the colors, the words on the pin, or the description.
There are several reasons why you should create multiple pins for each blog post.
1. If you have more pins you'll get more exposure, more repins, more clicks and more traffic to your blog.
2. You can promote the same blog post multiple times by using different pins and different descriptions.
3. You can test different images, colors, headlines, descriptions and keywords and find out which pins give you the most repins and clicks to your blog.
4. Pinterest says that a new pin image is new content for them – even if it goes to an old blog post. And pinning new content will give you more exposure than repinning old pins.
5. When putting multiple pin images in your blog posts, your readers can save multiple images to Pinterest and can get you additional pin views, repins, clicks and traffic.
TIPS:
- Designing a bunch of pin variations at the same time is more efficient than making one pin at a time.
- Using templates makes it even easier to create quality pins and make variations. Here are a few places that have beautiful templates. Check out my blog post about Pinterest Templates: How to Create Beautiful Pinterest Pins Quickly and Easily with Canva Templates
- When having multiple pins for the same blog post, you want to put several pins in your blog post but you want to hide the extra pins. See my article to find out How to Hide Pinterest Pins in Your Blog Posts.
4- Pinterest SEO
Pinterest SEO is very important to get the most exposure from pinning. I'll go into Pinterest SEO in more detail in another blog post but here's a quick checklist of how to optimize your pins for Pinterest.
- Write a short, compelling Pin title that includes your keyword or key phrase.
- Write a compelling Pin description that includes your keywords. Currently, the recommendation is NOT to use hashtags.
- Add a TITLE tag and ALT tag to your Pin images in your blog posts.
- Submit your pin to relevant boards. Spread out the submission to different boards over different days. Have a minimum of 2 days interval between submissions of the same pin.
- Link your pin to a blog post that has the same or similar keywords and relevant content. This is very important.
Use relevant keywords in your board descriptions and pin descriptions
Pinterest is a search engine. If you want your pins to be easy to find in searches, you need to use relevant keywords in your pin descriptions, image titles, and alt descriptions on your blog.
Use the same and similar keyboards in your pin and the boards you're saving the pins to. You can expand your reach by having related boards with different descriptions on different pins.
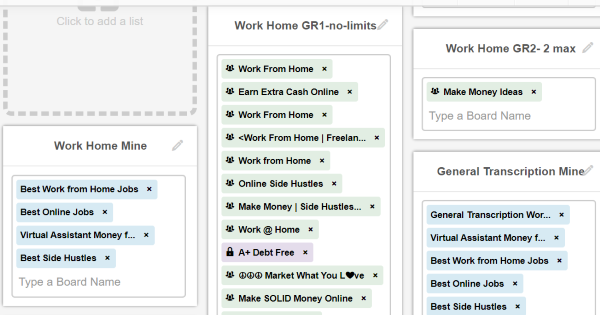
5 – Pin to quality, relevant boards
It's important that your pins link to relevant blog posts and that you save your pins to relevant boards only. Use the same or related keywords in the pin and the boards you're submitting to. When pinning other people's pins, check them to make sure they go to quality, relevant posts as well.
Use board lists to schedule to many boards at once. Board lists are a useful feature provided by Tailwind. Board lists make it super easy and fast to pin to multiple boards at once. A board list groups several boards together so that you can easily schedule to a bunch of boards all at once. You can create board lists with your own boards, group boards or a combination of both. You’ll want to create board lists with boards that cover similar topics and target the same audience.
NOTE: Only schedule a pin to a maximum of 10 boards (this is one of the newer recommendations). it's also important to only pin to relevant boards.
Get Tailwind's free trial here.
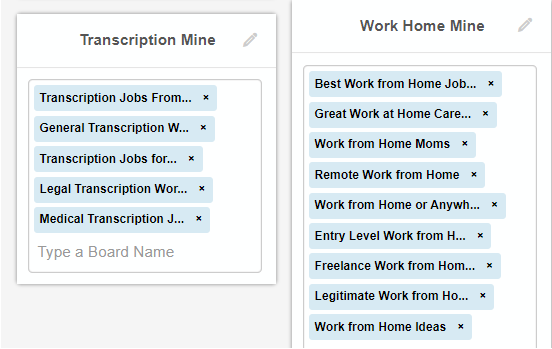
Board names that are blue are my boards. The green highlighted lists are group boards.
6 – Pin at the best times to reach your audience
It's important to pin at optimal times when your target audience is on Pinterest and is more likely to see your pins. This will increase engagements like close-ups, clicks and saves.
The best times to pin will be different for different niches and audiences.
How do you find your best times to pin?
One way to find out when your audience is on Pinterest is by checking Google statistics.
But the easiest way to pin at optimal times is by using Tailwind. Tailwind is a social media scheduler for Pinterest and Instagram. The Tailwind's SmartScheduler knows when your audience is on Pinterest!
After pinning for a couple of weeks with Tailwind, Tailwind learns when your audience is on Pinterest. When setting up your schedule on Tailwind, you tell Tailwind how many pins you want to schedule each day. Then, Tailwind's SmartScheduler automatically populates and schedules your pins at optimal times.
Pinterest can close your account if they think you're spamming. Following the latest Pinterest guidelines, I reduced my pinning from 50-70 pins a day to around 25 pins a day and changed my Tailwind schedule accordingly. Tailwind will even send you a warning if you pin more than the recommended number of pins a day. When I was slightly going over 25 pins, Tailwind gave me a “spam safeguard notice” that said : “As a guideline, our most successful pinners publish closer to 15-25 Pins per day, on average.
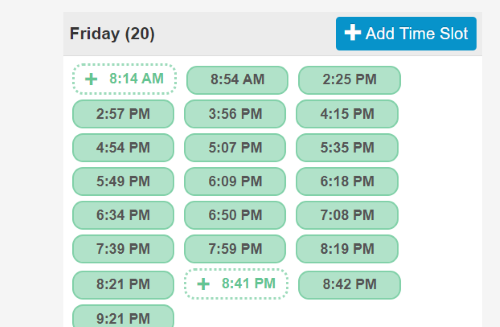
The image below shows my pinning schedule that is set at an average of 25 timeslots per day. Today, Tailwind recommends posting 15 to 25 pins a day and no more than 25 to avoid spamming issues.
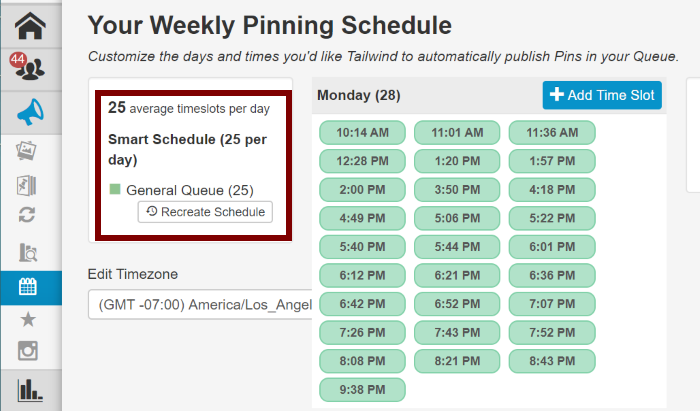
The green time slots are times slots were generated by Tailwind's Smart Schedule.
Time slots surrounded by a dotted green line are recommended time slots – that I haven't added to your schedule yet.
If you don't use Tailwind, you can check Google Analytics to see when your audience is visiting your site.
I highly recommend that you use Tailwind. Tailwind makes Pinterest scheduling so much faster, easier and better. See my review of Tailwind here.
Try Tailwind with the free Tailwind trial.
7 – Use Tailwind Communities (previously called Tribes)
Tailwind Communities are much more effective than Pinterest group boards. Tailwind Communities make it easy to share your content with a group of people for repins. It is one the best features of Tailwind.
I started getting many repins from Tailwind Communities from day one and have seen dramatic increases in my traffic since using Communities. I'm getting a lot more repins from Communities than from group boards.
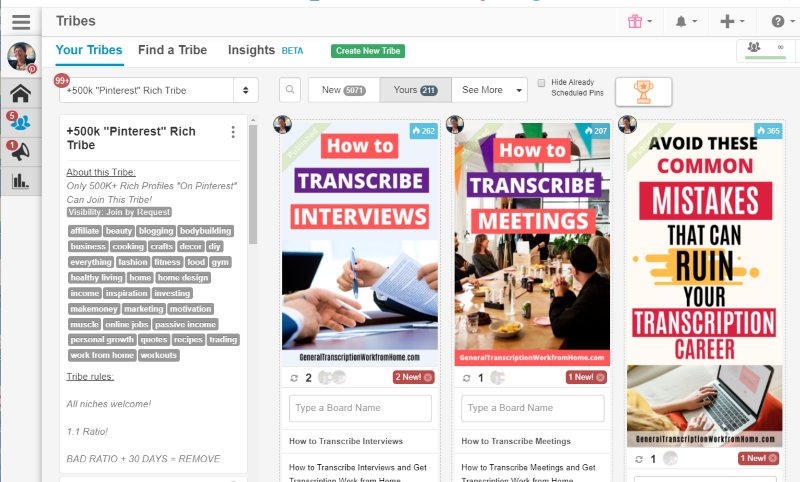
I recommend that you join only active Communities that are related to your topic. The screen capture image below shows how you can see your new reshares. When clicking on the “new” button, you can see who reshared your pins. When clicking on “see submissions,” you'll see the pins they submitted to the Tribe and you can share some of their pins.
I found the process of getting started with Communities confusing but now I love Communities and I'm getting a ton of traffic from it!
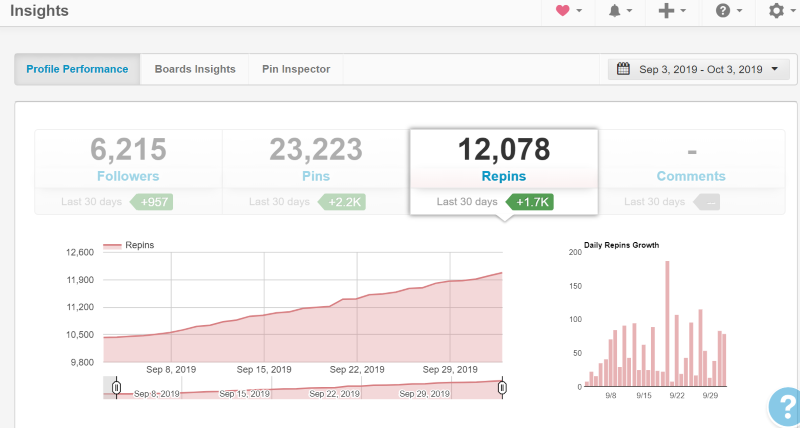
- See how my traffic and repins increased in just my first month. And I had only joined a few tribes in the first 2 weeks.
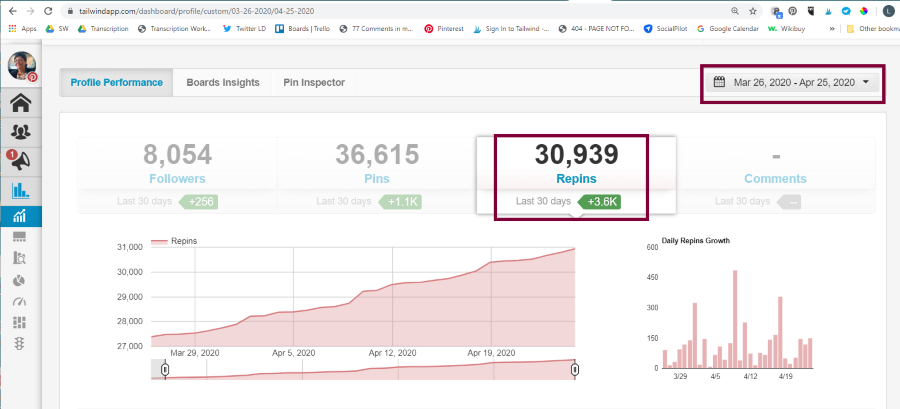
See how the number of repins has trippled in 6 months.
More Scheduling Benefits:
8. Evaluate what works and change what doesn't.
Tailwind's analytics makes it easy to find out what your best pins are. Look at your best performing pins and make more pins that are similar. Create variations of underperforming pins by making small changes, e.g. change the image, the color, the title on the pin, or the description.
NOTE: Pinterest recommends not to waste time with changing the description of existing pins. They only use the description to evaluate your topic when you initially post the pin. To get the best results with your pin descriptions, create a different description with different keywords when creating additional new pins.
Start applying these strategies now to be more successful with your Pinterest marketing, get more Pinterest clicks and repins and get more traffic to your blog.
Tailwind is in my opinion the BEST program for Pinterest scheduling. If you're doing any Pinterest marketing, you must check it out!
Click here to try Tailwind with the free Tailwind trial.
BONUS TIP: Avoid Mistakes
Take a few seconds to proofread the text on your pin, the title, the description, and the hashtags, and make sure everything is spelled correctly.
Grammarly is a free tool that can help you make sure that you’re not making any spelling or grammar mistakes. It's a really great tool for bloggers, writers, designers and for any type of business. Grammarly has a free version and premium version. Check it out here.
SOCIAL MEDIA RESOURCES
- The Best Free Stock Photos and Images.
- Tailwind – The best scheduling tool for Pinterest. They have an Instagram version too (but I haven’t tried Tailwind for Instagram yet). You can read my Tailwind review here.
- SmarterQueue – An all-in-one social media management tool that boosts engagement and lets you curate, schedule, listen, reply and analyze in one place (SmarterQueue comes highly recommended by experts).
- SocialPilot – Automates scheduling for a wide range of social media (I’m using it for Twitter and Facebook scheduling). You can read my review of Social Pilot here.
- Hootsuite – Automates scheduling for several social media (I used to use it but switched to using SocialPilot). You can read my Hootsuite review here.
- Social Media Marketing World 2021 – Discover the best social media marketing techniques from the world’s top experts. Or get the 2020 recordings.
- Check out this planner bundle to help you plan your social media, your marketing, and your newsletters.
BLOGGING RESOURCES
- Recommended hosting for beginners: Bluehost.
- WordPress themes: ElegantTheme, GeneratePress, Genesis & Thesis – DIYThemes.
- Popular autoresponders: ConvertKit, Aweber, GetResponse, and MailChimp.
- The best online spelling and grammar checker: Grammarly.
- Best Pinterest scheduler: Try Tailwind with the free Tailwind trial.
- Easy-to-use software to design blog and social media images: Canva.
- 30 Surefire Ways to Build and Grow Your Email List Fast.
- Making Sense of Affiliate Marketing.
